
I’ve been making this empanadas recipe for years now, and let me tell you, it never gets old. There’s something about that flaky crust giving way to savory, seasoned beef that just hits the spot every single time. My family begs me to make these on game day, and honestly? I’m happy to oblige. You know what I love most about empanadas? They’re so versatile. Once you get the hang of this beef version, you can easily swap things up. Try an empanadas recipe chicken for something lighter, or go sweet with an apple empanadas recipe (trust me, it’s a game changer). I’ve even experimented with an apple empanadas recipe easy enough for the kids to help with. Got vegetarian friends coming over? A vegetarian empanadas recipe works beautifully. My neighbor swears by her pork empanadas recipe, and my grandma? She sticks to her authentic empanadas recipe that’s been in the family forever. These little pockets of joy are perfect for any occasion. Pack them in lunchboxes, serve them at parties, or just make a batch for yourself (no judgment here). The best part? You can freeze extras and bake them straight from frozen when cravings hit. I always keep a stash in my freezer for those days when cooking feels like too much work. Pop a few in the oven, and boom, dinner’s done. Plus, they reheat way better than takeout ever could.
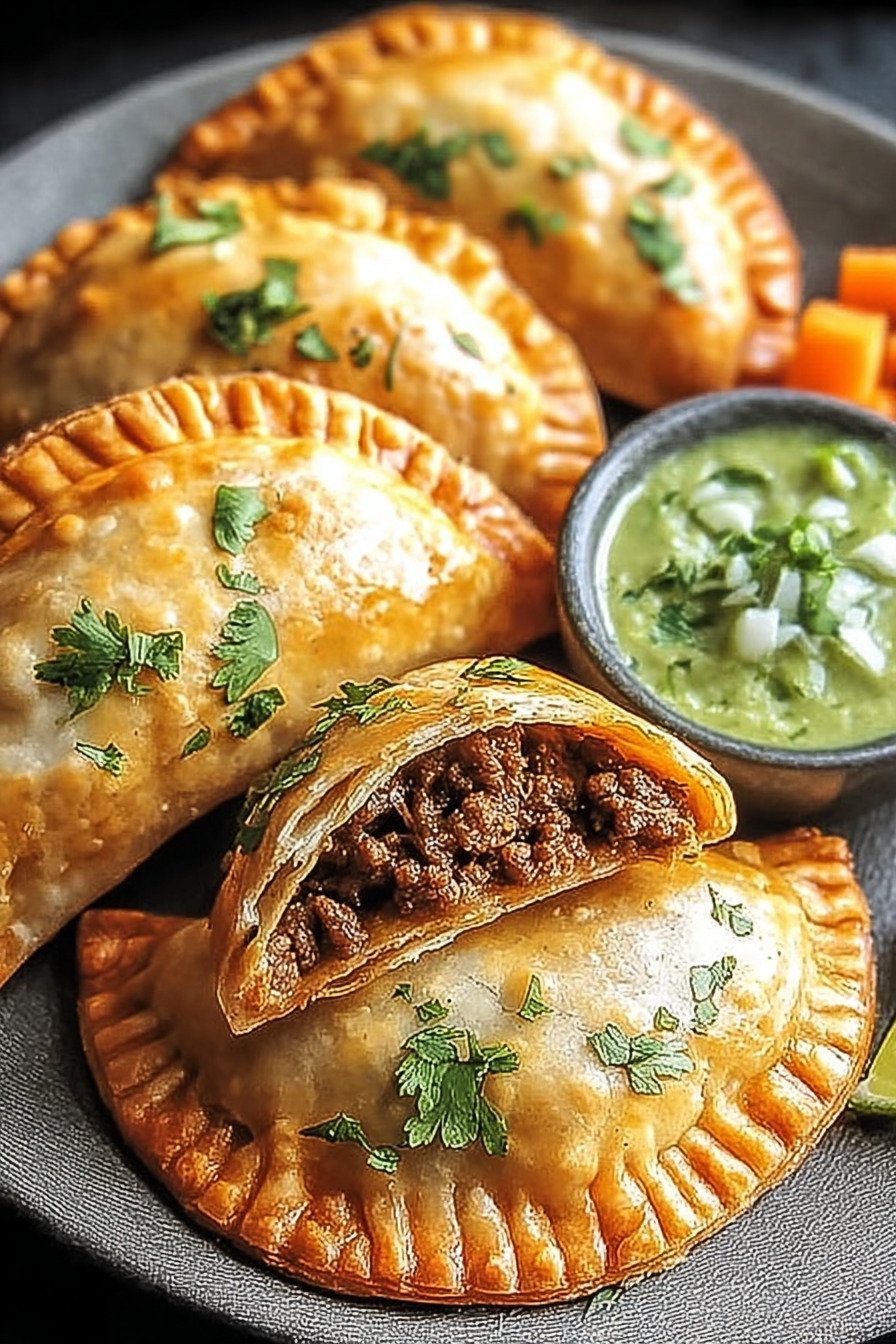
Table of Contents
- 1) Key Takeaways
- 2) Easy Beef Empanadas Recipe
- 3) Ingredients for Beef Empanadas
- 4) How to Make Beef Empanadas
- 5) Tips for Making Beef Empanadas
- 6) Making Beef Empanadas Ahead of Time
- 7) Storing Leftover Beef Empanadas
- 8) Try these Appetizers next!
- 9) Easy Beef Empanadas
- 10) Nutrition
1) Key Takeaways
- What’s the secret to keeping empanada dough from getting soggy?
- Can you freeze empanadas before or after cooking them?
- What’s the best way to seal empanadas so they don’t burst open?
- How do you know when beef empanadas are done baking?
2) Easy Beef Empanadas Recipe
Listen, I know what you’re thinking. Making this empanadas recipe from scratch sounds like a lot of work, right? But here’s the thing, it’s actually way easier than you’d expect. I remember the first time I made these for my family. My husband walked into the kitchen, took one bite, and asked if I’d secretly ordered them from our favorite Latin restaurant. Nope, just me and my trusty skillet working some magic with this empanadas recipe.
What makes this recipe so great is how forgiving it is. You don’t need fancy skills or expensive equipment. Got a skillet and an oven? You’re halfway there. The filling comes together in about 15 minutes, and the actual assembly? Well, that’s where things get fun. I like to put on some music and make it a little event. Sometimes my kids help out, and yeah, their empanadas might look a bit wonky, but they taste just as good.
The best part about learning how to make an empanadas recipe like this one is that you can customize it endlessly. Once you nail down the technique with beef, you can switch things up. I’ve got friends who swear by their empanadas recipe chicken variations, and my sister makes this incredible apple empanadas recipe for dessert that has everyone begging for seconds. My neighbor even does an apple empanadas recipe easy enough for her kids to make solo.
One Sunday, I had some vegetarian friends coming over, so I adapted this into a vegetarian empanadas recipe with black beans and corn. It was such a hit that now I alternate between the two. My cousin prefers her pork empanadas recipe, and my abuela? She’s still the queen with her authentic empanadas recipe passed down through generations. But this beef version holds its own beautifully.
The beauty of homemade empanadas is that they’re perfect for any situation. Game day? Check. Potluck dinner? Absolutely. Random Tuesday when you can’t deal with cooking a full meal? You bet. I always keep a stash in my freezer because they reheat like a dream. Pop a few in the oven straight from frozen, and twenty minutes later you’ve got a hot, crispy meal that tastes like you spent hours in the kitchen. Nobody needs to know it took basically no effort.
3) Ingredients for Beef Empanadas
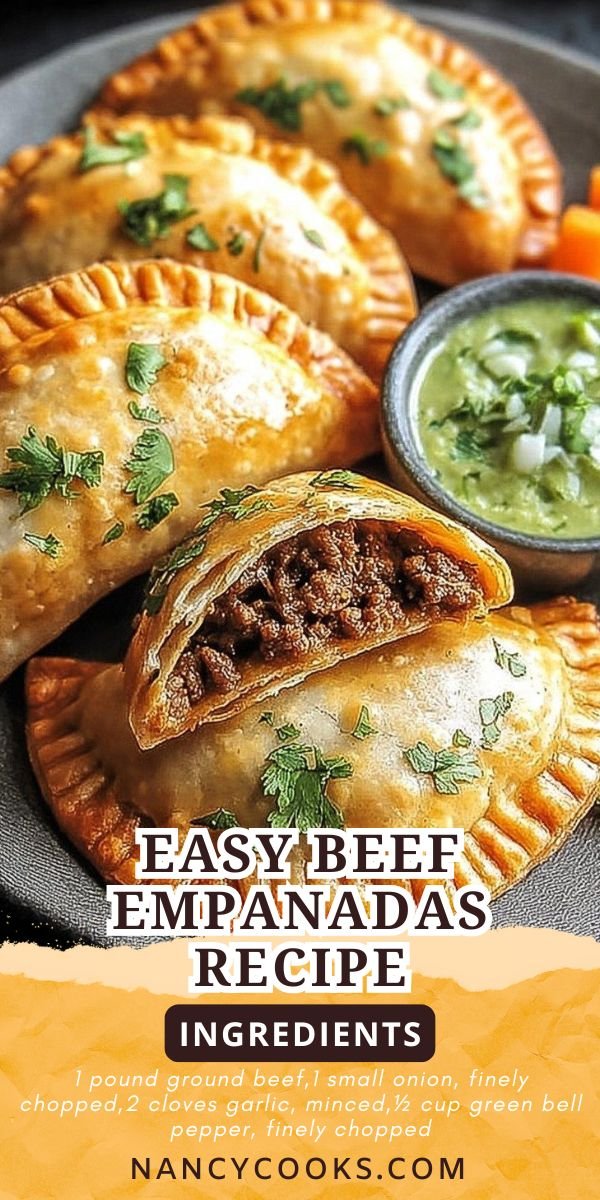
Ground Beef is the star of the show here. I go for lean ground beef, usually 85/15 or 90/10, because you don’t want your filling swimming in grease. Trust me on this one. I learned the hard way when I used 80/20 once and had to drain what felt like a cup of fat. Nobody wants that mess. If beef isn’t your thing, ground turkey works great too, just add a tiny splash of olive oil to keep things moist.
Onion brings sweetness and depth to the filling. I always use yellow onions because they caramelize beautifully when you sauté them. My mom swears by sweet onions, and honestly? That works too. Just chop them small so you get a little bit in every bite. There’s nothing worse than chomping down on a huge chunk of raw onion. Been there, done that, learned my lesson.
Garlic is non negotiable in my kitchen. Fresh garlic cloves, minced up nice and fine, make everything smell amazing. I usually use two or three cloves depending on how much I love whoever I’m cooking for. Just kidding, I always use three. The smell of garlic and onions hitting hot oil is basically my happy place. Skip the jarred stuff if you can, fresh always tastes better.
Green Bell Pepper adds a nice crunch and freshness to the filling. I dice mine pretty small so it blends in with everything else. If you want a sweeter taste, red or yellow peppers work great. My brother likes to throw in half a jalapeño for some kick, which is totally worth trying if you like heat. Just remember to remove the seeds unless you want your empanadas to double as a fire hazard.
Ground Cumin is where the Latin flavor really starts to shine through. This earthy, warm spice is what makes the filling taste authentic. Don’t skip it, and definitely don’t substitute it with cumin seeds because they won’t distribute evenly. I keep a big container of ground cumin in my spice cabinet just for recipes like this.
Paprika adds a subtle sweetness and gorgeous color to the meat. I use regular paprika, not the smoked kind, though smoked paprika would add an interesting twist if you’re feeling adventurous. Sometimes I’ll add just a pinch extra because I love the way it makes the filling look, all rich and reddish brown.
Salt and Pepper might seem basic, but proper seasoning makes or breaks this recipe. I’m talking kosher salt here, not table salt, because it’s easier to control. And freshly cracked black pepper? Chef’s kiss. Season generously but taste as you go. You can always add more but you can’t take it back.
Shredded Cheese melts into the beef filling and creates these amazing gooey pockets of deliciousness. I usually grab cheddar or a Mexican blend from the store. Sharp cheddar gives you more flavor, mild cheddar is great if you’ve got picky eaters. Sometimes I’ll mix in a little Monterey Jack because it melts like butter. Whatever you do, shred it yourself if you have time. Pre shredded cheese has that anti caking stuff on it that keeps it from melting as smoothly.
Empanada Dough is what holds all this delicious filling together. You can find refrigerated empanada dough at most grocery stores in the Latin foods section, and honestly? It works perfectly. But if you want to go full homemade, making your own dough is pretty simple. Mix flour, butter, salt, and cold water until it comes together, then chill it for half an hour. Homemade dough has this amazing buttery flavor that store bought just can’t match, but I won’t judge you either way.
Egg for the wash is what gives your empanadas that beautiful golden brown color when they bake. Beat one egg with a tiny splash of water, then brush it over the tops before they go in the oven. This step is optional if you’re frying instead of baking, but I do it anyway because pretty food tastes better. That’s science. Okay, maybe not real science, but it’s true.
Olive Oil is what you’ll need for frying if you go that route, or for brushing if you’re baking. I keep a big bottle on hand for everything. Extra virgin works great, but regular olive oil is fine too. If you’re frying, make sure you have enough to fill your pan about an inch deep. And please, please use a thermometer or test with a small piece of dough first so you don’t end up with burnt empanadas.

4) How to Make Beef Empanadas
Step 1 is getting your aromatics going. Heat up your skillet over medium heat and drizzle in some olive oil. Once it’s shimmering, toss in your chopped onion, minced garlic, and diced green bell pepper. Let them sauté for about five minutes, stirring occasionally so nothing sticks to the bottom. Your kitchen should start smelling absolutely incredible right about now. This is when my family usually wanders in asking what’s for dinner.
You want the onions to get soft and slightly translucent, and the peppers should lose that raw crunch. Don’t rush this part by cranking up the heat. Medium heat lets everything cook evenly and develop those sweet, caramelized flavors. If things start browning too fast, just lower the heat a bit. No biggie.
The garlic should smell toasty and fragrant but not burnt. Burnt garlic tastes bitter and will ruin your whole batch, so keep an eye on it. Stir every minute or so, and if you see any pieces starting to brown too much, just move them around the pan. This base is what gives your filling so much flavor, so take your time and get it right.
Step 2 is adding the beef. Crumble your ground beef right into the skillet with the vegetables. Use a wooden spoon or spatula to break up the meat into small pieces as it cooks. You don’t want big chunks, you want a nice crumbly texture that mixes well with all the other ingredients. Keep breaking it up and stirring until every bit of pink is gone, which takes about seven to ten minutes.
While the beef cooks, it’ll release some liquid. That’s totally normal. Just keep cooking until most of that liquid evaporates. You want the filling to be moist but not soupy. If you used a fattier ground beef, you might need to drain off some grease at this point. Tilt the pan and use a spoon to scoop out the excess fat into a container. Never pour it down the sink unless you want to call a plumber later.
Once the meat is fully browned and most of the liquid has cooked off, you’re ready for the next step. The beef should look nice and crumbly, mixed throughout with all those delicious vegetables. This is starting to look and smell like real empanada filling now.
Step 3 is where we add all the flavor. Sprinkle in your ground cumin, paprika, salt, and pepper. Stir everything together really well so every bit of meat gets coated with the spices. Let it cook for another two or three minutes so the spices toast slightly and really bloom. This step takes your filling from good to absolutely crave worthy.
Taste the filling now and adjust the seasoning if you need to. Does it need more salt? A bit more cumin? Trust your taste buds. Everyone’s preferences are different, and your beef might have been saltier than mine. Once you’re happy with how it tastes, turn off the heat and stir in your shredded cheese. The residual heat will melt it perfectly.
Mix that cheese in until it’s all melted and gooey, coating the beef in cheesy goodness. Then set the filling aside to cool down a bit. You can’t fill empanadas with scorching hot filling because it’ll make the dough soggy and hard to work with. I usually let mine sit for about ten or fifteen minutes. Sometimes I’ll stick the pan in the fridge to speed things up if I’m impatient.
Step 4 is prep time. If you’re baking your empanadas, crank your oven up to 400°F now so it has time to preheat. Line a baking sheet with parchment paper to keep things from sticking. If you’re frying, get your oil heating in a deep pan over medium heat. You want it around 350°F, hot enough to make the dough sizzle when you drop in a test piece.
Clear off your counter and lay out your empanada dough circles. If your dough came in a package, it should already be cut into circles. If you made your own dough, roll it out to about an eighth of an inch thick and use a bowl or cookie cutter to cut out circles about five or six inches across. Keep any unused dough covered with a damp towel so it doesn’t dry out.
Set up your little assembly station with the dough circles, the cooled filling, a small bowl of water, and your beaten egg if you’re baking. Having everything organized makes the whole process go so much faster. I learned this the hard way after spending way too long walking back and forth across my kitchen like a crazy person.
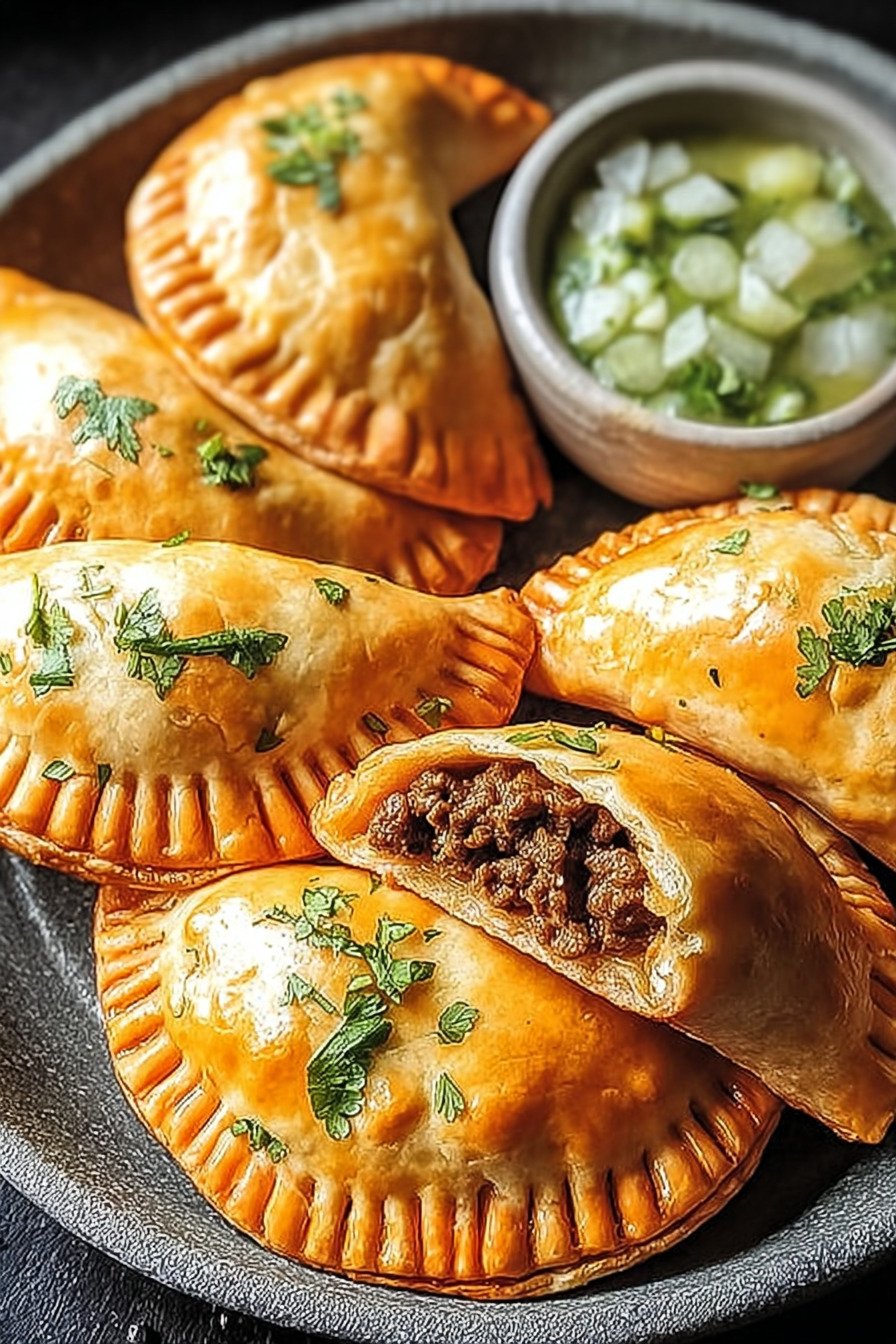
Step 5 is the fun part where you actually make the empanadas. Take one dough circle and place a generous spoonful of filling right in the center. Don’t go overboard here. I know it’s tempting to stuff them full, but if you use too much filling, they’ll burst open when they cook. Trust me, I’ve had empanada explosions before and cleaning melted cheese off a baking sheet is no fun.
Dip your finger in the water and run it along the edge of the dough circle. This helps the dough stick to itself when you seal it. Now fold the circle in half over the filling to make a half moon shape. Press the edges together firmly, starting in the middle and working your way out to each end. You want a really good seal.
Once it’s sealed, use a fork to crimp all around the edge. Press the fork tines into the dough to create that classic wavy pattern. This doesn’t just look pretty, it also reinforces the seal so your filling stays put. If you notice any spots that don’t seem sealed well, just crimp them again. Repeat this process with all your dough circles until you run out of filling or dough.
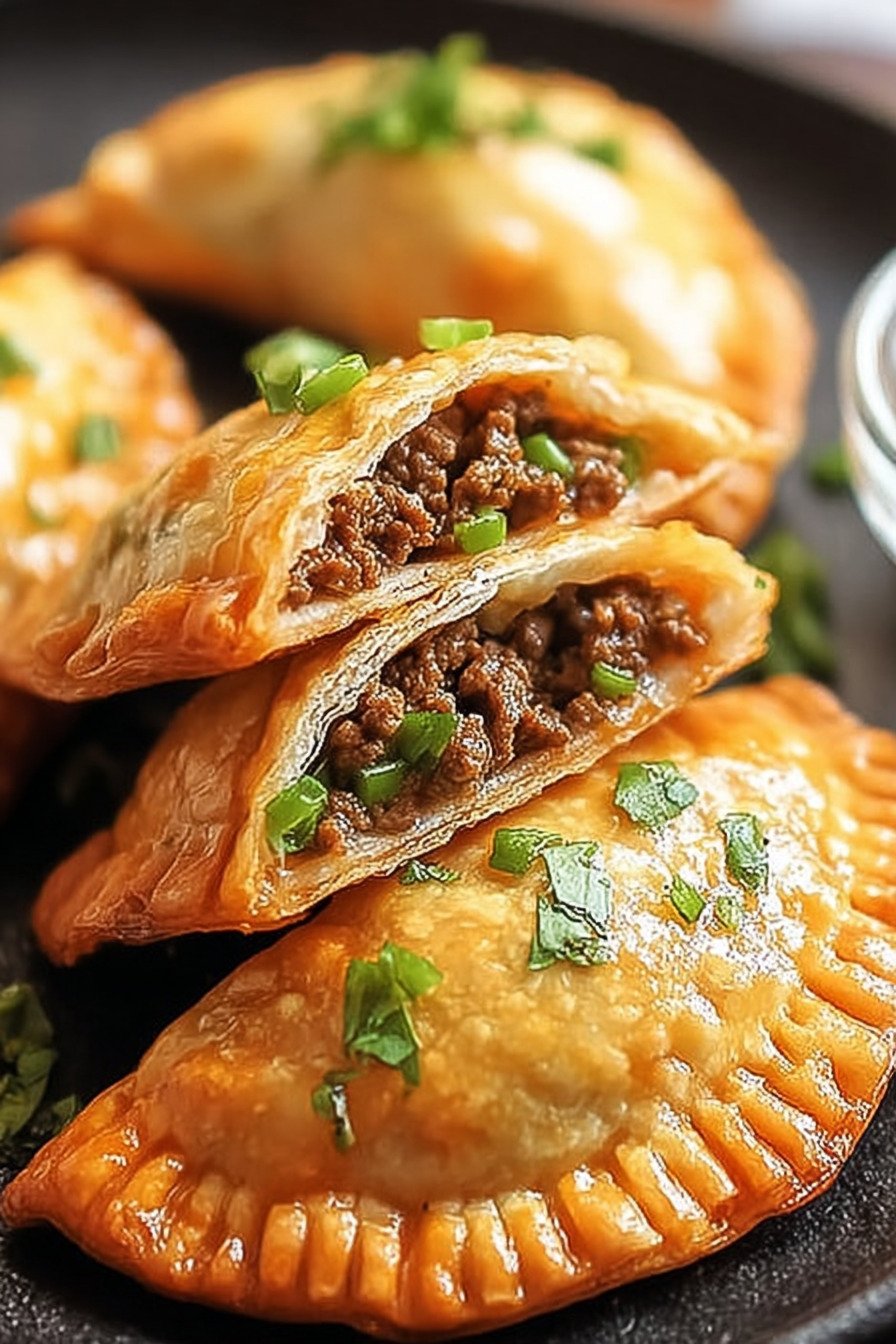
Step 6 is cooking time. For baking, arrange your empanadas on your prepared baking sheet, leaving a bit of space between each one. Brush the tops with that beaten egg wash. This is what makes them turn that gorgeous golden brown color. Slide the pan into your preheated oven and bake for twenty to twenty five minutes. They’re done when they’re golden brown and the dough looks crispy.
For frying, carefully lower each empanada into the hot oil. Don’t crowd the pan, maybe do three or four at a time depending on your pan size. Fry them for about three to four minutes on each side until they’re golden brown and crispy. Use a slotted spoon or spider to flip them and then lift them out. Set them on a plate lined with paper towels to drain off any excess oil.
Whether you bake or fry, let them cool for just a few minutes before you dig in. The filling will be lava hot right out of the oven or fryer, and burning the roof of your mouth is not the way to enjoy these beauties. I usually can’t wait more than five minutes before I’m grabbing one, but at least give them a minute or two.
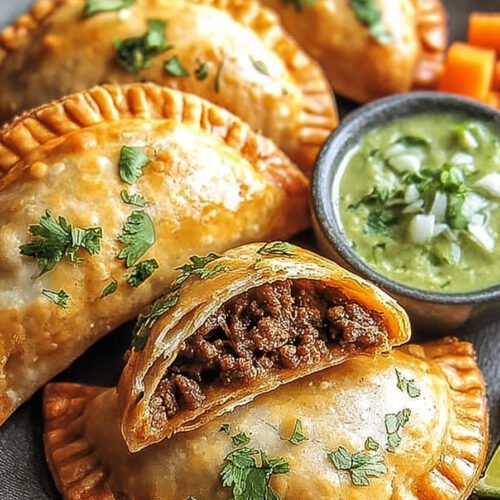
Step 7 is the best part, eating them. Serve your empanadas warm with whatever dipping sauce you love. I’m a sucker for guacamole or some good salsa verde, but sour cream works great too. Some people like chimichurri, and honestly? I’m not mad at that choice either. Pile them on a platter, grab some napkins, and watch them disappear.
The crispy, flaky crust gives way to that savory, seasoned beef filling with melty cheese in every bite. It’s the kind of food that makes people stop talking for a second because they’re too busy enjoying what they’re eating. That’s when you know you’ve nailed it. Pat yourself on the back, you just made incredible empanadas from scratch.
5) Tips for Making Beef Empanadas
Let’s talk about keeping your filling from getting too wet. This is something I learned after making a few soggy disasters. The key is cooking off as much liquid as possible from the meat and vegetables. When the beef releases its juices, don’t drain them right away. Let them cook down and evaporate first. This concentrates all those beefy flavors back into the filling instead of pouring them down the drain.
If you’re using vegetables that tend to release a lot of water, like mushrooms or zucchini, sauté them separately first and let them shed their moisture before adding them to the beef. Same goes if you want to add tomatoes. Cook them down until they’re jammy and most of the liquid is gone. Wet filling equals soggy empanadas, and nobody wants that.
Here’s another trick that changed my empanada game. Let your filling cool completely before you start assembling. I know you’re excited and want to dive right in, but hot filling makes the dough soft and difficult to work with. It can also start cooking the dough before you even seal it, which makes getting a good seal nearly impossible. Stick that filling in the fridge for twenty minutes if you need to. Your future self will thank you when you’re not wrestling with sticky dough.
Sealing is probably where most people run into trouble. The secret is making sure your edges are completely dry before you seal them. Any grease or liquid on the edges will prevent the dough from sticking to itself. If you notice any oil on the edges, just wipe it off with a paper towel. Then use that water trick I mentioned earlier, just a little bit on your fingertip, to help the dough bond.
Press firmly when you seal. Don’t be shy about it. You want those edges really stuck together. I like to press with my fingers first, then go over it again with a fork. That double seal has saved me from many potential empanada disasters. If you see any weak spots or gaps, just press again until they’re sealed tight.
One more thing about sealing, don’t overfill. I can’t stress this enough. It’s so tempting to stuff them full, but a moderately filled empanada that stays sealed is way better than an overstuffed one that bursts open and leaks everywhere. Use about two tablespoons of filling per empanada. That’s plenty. You can always make more empanadas with any leftover filling.
Temperature control matters whether you’re baking or frying. For baking, make sure your oven is fully preheated. Putting empanadas in a cold oven means they’ll heat up slowly and get greasy instead of crispy. Pop an oven thermometer in there if you’re not sure your oven runs true to temp. Many ovens run hot or cold, and knowing this helps you adjust.
If you’re frying, invest in a thermometer if you don’t have one already. Oil that’s too cool makes greasy empanadas. Oil that’s too hot burns the outside before the inside heats through. You want that sweet spot around 350°F. Drop a tiny piece of dough in first as a test. It should sizzle and float immediately but not smoke or burn. That’s how you know you’re ready.
Don’t crowd your pan when frying. I know you want to get them all done at once, but overcrowding drops the oil temperature too much. This makes the empanadas absorb more oil and get greasy instead of crispy. Work in batches, giving each empanada enough room to float freely. Yes, it takes longer, but the results are worth it.
Here’s a game changer if you’re making a big batch. You can assemble all your empanadas and freeze them before cooking. Lay them on a baking sheet lined with parchment paper, making sure they don’t touch. Freeze until solid, then transfer to a freezer bag. They’ll keep for up to three months. When you want to cook them, you can bake or fry them straight from frozen. Just add a few extra minutes to the cooking time.
One final tip that seems small but makes a difference. Let your baked empanadas rest on a wire rack instead of keeping them on the baking sheet. This keeps the bottoms from getting soggy from trapped steam. If you fried them, that paper towel trick works wonders for soaking up excess oil. But transfer them to a clean plate after a minute or two so they’re not sitting in that oil.
6) Making Beef Empanadas Ahead of Time
Making empanadas ahead of time is honestly one of my favorite meal prep strategies. I’ll spend a Sunday afternoon assembling a massive batch, and then I’ve got easy dinners or snacks for weeks. The filling actually tastes even better the next day when all those flavors have had time to really meld together. It’s one of those rare recipes where the leftovers might be better than the fresh version.
You’ve got a few options for how far ahead you want to prep. The easiest approach is to make the filling up to two days in advance. Just cook it, let it cool, and store it in an airtight container in the fridge. When you’re ready to make the empanadas, the filling will be perfectly chilled and super easy to work with. Cold filling is actually easier to portion out than room temperature filling, so this method has some real advantages.
If you want to go one step further, assemble the empanadas completely but don’t cook them yet. Arrange them on a baking sheet in a single layer, making sure they’re not touching each other. Cover the whole sheet with plastic wrap or slide it into a large plastic bag. They’ll keep in the fridge like this for up to 24 hours. When you’re ready to cook, just brush them with egg wash and pop them straight in the oven or into the hot oil.
For longer storage, freezing is your best friend. Assemble the empanadas just like you normally would, then freeze them on a baking sheet until they’re solid. This usually takes a few hours. Once frozen, transfer them to freezer bags or containers. I like to layer them with parchment paper between each layer so they don’t stick together. Label the bag with the date so you know when you made them.
Frozen empanadas will keep beautifully for up to three months. I’ve pushed it to four months before and they were still totally fine, but three months is the safe zone where you know they’ll taste their best. Just don’t forget about them in the back of your freezer like I did once. Finding a mysterious bag of empanadas six months later was disappointing, to say the least.
When you’re ready to cook frozen empanadas, you don’t need to thaw them first. This is what makes them such a perfect freezer meal. If you’re baking, add about five to ten extra minutes to the cooking time. Keep an eye on them to make sure they’re getting golden brown all over. For frying, the oil might cool down a bit more when you add frozen empanadas, so you might need to work in smaller batches.
One thing I learned the hard way is to freeze them before brushing with egg wash. If you brush them with egg before freezing, the egg wash can get weird and crusty in the freezer. Instead, brush them with egg wash right before baking, even if they’re frozen. It takes two extra seconds but makes a huge difference in how they look when they come out of the oven.
You can even freeze the filling by itself if you want to break up the work differently. Cook the filling, let it cool completely, then portion it into freezer bags. Lay the bags flat in the freezer so they freeze in a thin layer. This makes them thaw faster when you need them. Thaw the filling overnight in the fridge before assembling your empanadas.
If you’re planning to bake empanadas that have been refrigerated, remember to let them sit at room temperature for about fifteen minutes before baking. Cold empanadas going into a hot oven can sometimes crack because of the temperature shock. Letting them warm up just a little bit prevents this. Same goes for frying, though it’s less of an issue there.
7) Storing Leftover Beef Empanadas
Let’s be real, you probably won’t have many leftovers because these disappear fast. But if you do manage to have some left, storing them properly keeps them tasting great for days. Once the empanadas have cooled to room temperature, transfer them to an airtight container. You can layer them with parchment paper if you’re stacking them so they don’t stick together, though honestly I usually just toss them in and call it a day.
Stored in the fridge, cooked empanadas will last about three to four days. I’ve eaten them on day five before and lived to tell the tale, but four days is the safe recommendation. Make sure your container is actually airtight, not just a plate covered with foil. You want to keep moisture out so the empanadas don’t get soggy or absorb weird fridge smells.
Reheating is where you can make or break your leftover empanadas. The microwave is quick but it’ll make them soft and kind of sad. If you’re in a huge rush, microwave them for about 30 seconds just to warm them through, but know they won’t have that crispy exterior anymore. For a much better result, reheat them in the oven. Preheat to 350°F, arrange the empanadas on a baking sheet, and heat them for about ten to fifteen minutes.
An air fryer is actually perfect for reheating empanadas if you have one. Set it to 350°F and heat them for five to seven minutes. They come out crispy and hot, almost like they’re freshly made. I discovered this by accident when I was reheating some for lunch and now it’s my go to method. The air fryer makes them crispy without any extra oil, which is a nice bonus.
You can also freeze cooked empanadas if you made way too many or want to save some for later. Let them cool completely, then freeze them the same way you’d freeze uncooked ones. Freeze on a baking sheet first, then transfer to freezer bags once solid. They’ll keep in the freezer for up to two months. When you reheat frozen cooked empanadas, you’ll want to add extra time to make sure they’re heated all the way through.
Here’s a weird tip that actually works. If your leftover empanadas got a little soggy in the fridge, you can crisp them back up by reheating them at a higher temperature for a shorter time. Try 400°F for about eight minutes. Keep an eye on them so they don’t burn, but that blast of high heat can work wonders on bringing back some crispiness.
Don’t store your empanadas with any wet dipping sauces. Keep the sauces separate in their own containers. Storing them together will make the empanadas absorb moisture and turn mushy. I learned this lesson when I packed empanadas and salsa together for a lunch. By the time I ate them, they were a soggy mess. Now I always pack sauces separately, even for just a few hours.
If you froze a huge batch and want to know how many to pull out for a meal, I’d estimate two to three empanadas per person as a main course, or one to two as an appetizer. Of course this depends on how hungry everyone is and what else you’re serving. My teenage son can easily put away five or six, but that’s a whole different situation.
Room temperature empanadas are actually really good too, if you’re into that. Sometimes I’ll make a batch and just leave them on the counter for a few hours if I know we’ll be snacking on them throughout the day. They’re safe at room temperature for about two hours. After that, they need to go in the fridge to prevent any food safety issues. This is perfect for parties where people are grazing over time.
8) Try these Appetizers next!
9) Easy Beef Empanadas
Empanadas Recipe: Easy Beef Empanadas You’ll Love
Ingredients
For the Filling
- 1 pound ground beef
- 1 small onion, finely chopped
- 2 cloves garlic, minced
- ½ cup green bell pepper, finely chopped
- 1 teaspoon ground cumin
- 1 teaspoon paprika
- Salt and pepper to taste
- 1 cup shredded cheese (cheddar or Mexican blend)
For the Empanadas
- 1 package refrigerated empanada dough (or homemade dough)
- 1 egg, beaten (for egg wash)
- Olive oil (for frying or brushing)
Instructions
- Heat a bit of olive oil in a large skillet over medium heat. Toss in your chopped onion, garlic, and green bell pepper. Let them sizzle for about 5 minutes until they get soft and smell amazing. Give them a stir now and then so nothing burns.
- Add the ground beef to your skillet and break it up with a spoon. Cook it until it’s nicely browned, which takes about 7 to 10 minutes. Once it’s done, drain off any extra grease.
- Time to add flavor! Stir in the cumin, paprika, salt, and pepper. Let everything cook together for another 2 to 3 minutes. Pull the pan off the heat and mix in your shredded cheese until it melts into the beef. Set this aside to cool a little.
- Crank your oven up to 400°F if you’re baking these bad boys. Lay out your empanada dough circles on a clean counter. Spoon some beef filling into the center of each circle, but don’t go crazy with it or they’ll burst open.
- Fold each circle in half to make a half moon shape. Press the edges together really well, then use a fork to crimp them shut. This keeps all that delicious filling inside where it belongs.
- For baking: arrange your empanadas on a parchment lined baking sheet. Brush the tops with beaten egg so they’ll turn golden and gorgeous. Bake for 20 to 25 minutes until they’re golden brown and crispy.
- For frying: heat oil in a deep pan until it’s nice and hot. Carefully slide each empanada into the oil and fry for about 3 to 4 minutes per side until golden. Set them on paper towels to drain.
- Serve these beauties warm with some guacamole or sour cream for dipping. Watch them disappear faster than you can say empanadas!
10) Nutrition
Serving Size: 1 empanada | Calories: 285 | Sugar: 1.2 g | Sodium: 425 mg | Fat: 16 g | Saturated Fat: 6.5 g | Carbohydrates: 22 g | Fiber: 1.5 g | Protein: 12 g | Cholesterol: 55 mg


Leave a Comment