You know what? Making sourdough bread recipe at home doesn’t have to be scary. I get it – the whole sourdough thing can seem totally overwhelming when you’re just starting out. But here’s the truth: once you get the hang of this easy sourdough bread recipe, you’ll wonder why you waited so long to try it. I’ve been baking this loaf for years now, and honestly? It’s become my go-to weekend ritual. There’s something magical about mixing flour, water, and a bit of starter, then watching it transform into this gorgeous, crusty loaf. When you’re looking for an easy sourdough bread recipe with starter that actually works, this is it. What I love most is how forgiving this method is. Unlike those complicated kulcha recipe step by step or chicken momos recipe step by step tutorials that require perfect timing, this bread gives you flexibility. Got a busy schedule? No problem. This works whether you’re after an easy sourdough bread recipe no starter (well, you’ll need to get one first!) or a quick sourdough bread recipe that fits into your life. The overnight rise means you can mix it before bed and bake it the next day. Pretty cool, right?

Table of Contents
- 1) Key Takeaways
- 2) Easy Sourdough Bread Recipe
- 3) Ingredients for Sourdough Bread
- 4) How to Make Sourdough Bread
- 5) Tips for Making Sourdough Bread
- 6) Making Sourdough Bread Ahead of Time
- 7) Storing Leftover Sourdough Bread
- 8) Try these Bread recipes next!
- 9) Easy Sourdough Bread
- 10) Nutrition
1) Key Takeaways
- What makes sourdough bread different from regular bread?
- Do I need special equipment to make sourdough at home?
- How long does it take to make a loaf from start to finish?
- Can I adjust the timing to fit my schedule?
- What’s the secret to getting that crispy, golden crust?
2) Easy Sourdough Bread Recipe
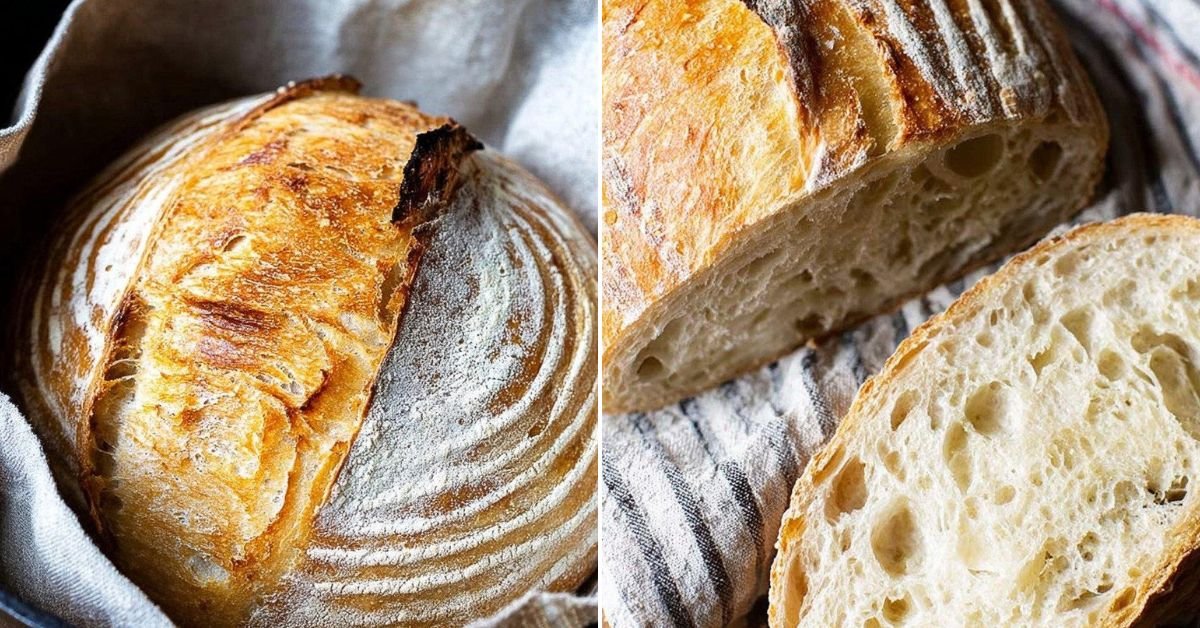
Let me tell you something about this sourdough bread recipe. I’ve been baking bread for years now, and this method has become my absolute favorite. When I first started with sourdough, I thought I needed to be some kind of bread wizard to pull it off. Turns out? Not even close. This easy sourdough bread recipe changed everything for me, and I’m betting it’ll do the same for you.
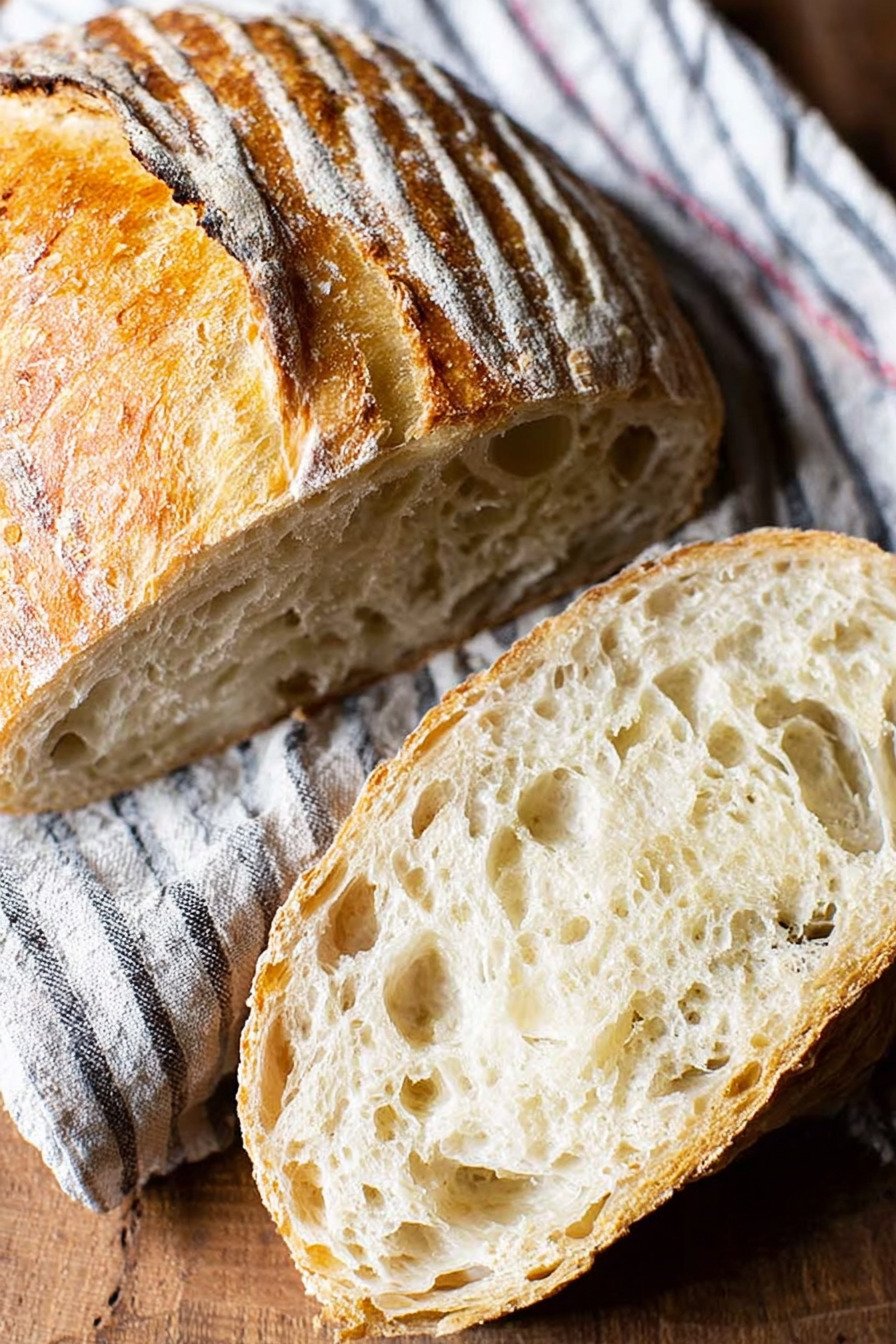
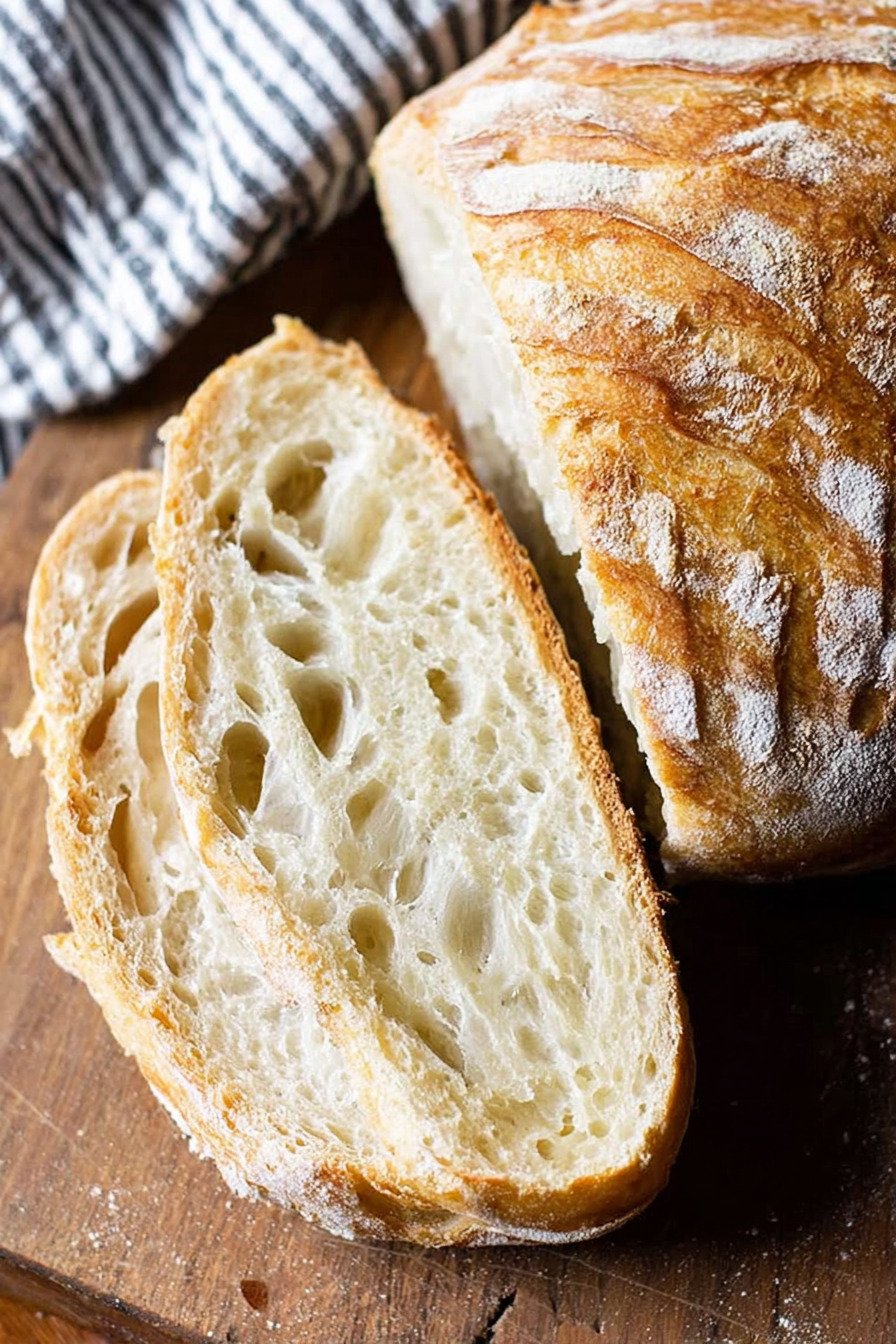
Here’s what makes this recipe so great. You get that authentic sourdough taste and texture without needing to babysit your dough all day. The overnight rise means you mix it up before bed, then wake up to dough that’s ready to shape and bake. Pretty sweet deal, right? I love how the crust comes out all crispy and golden while the inside stays soft and chewy with those gorgeous air pockets everyone goes crazy for.
What really sold me on this approach was how forgiving it is. Got stuck in traffic? Forgot to check on your dough? No worries. This bread doesn’t demand perfection. I’ve baked it on rushed weekday mornings and lazy Sunday afternoons, and it turns out beautifully every single time. The smell alone is worth making it. When that loaf comes out of the oven, your whole house smells like a bakery. My neighbors have actually knocked on my door asking what I’m making.
The best part? You only need four ingredients. Yep, just four. Active sourdough starter, water, bread flour, and salt. That’s it. No fancy additives, no weird ingredients you can’t pronounce. Just simple, honest ingredients that come together to create something magical. If you’ve been hunting for that perfect quick sourdough bread recipe that fits into real life, you just found it.
3) Ingredients for Sourdough Bread
Active Sourdough Starter: This is where the magic happens. Your starter should be bubbly and doubled in size before you use it. I feed mine in the morning, and by late afternoon it’s ready to go. If you don’t have a starter yet, don’t panic. Ask around – seriously, sourdough bakers love sharing their starter. We’re like a secret club, except we tell everyone about it. You can buy one online too, which works just as well. Once you have it, feed it regularly and it’ll last forever. Mine is going on three years now.
Water: Just regular tap water works fine for me. Some people get really particular about water temperature and mineral content, but honestly? I’ve never had issues with plain old tap water at room temperature. If your tap water tastes weird or is heavily chlorinated, you might want to use filtered water. The dough needs that water to bring everything together and create the right texture. Think of it as the glue that makes everything work.
Bread Flour: Here’s where I’ll be a bit picky. Use bread flour, not all-purpose. The higher protein content in bread flour gives your loaf that perfect chewy texture and helps it rise properly. I’ve tried cutting corners with all-purpose flour before, and the results just weren’t the same. The bread came out denser and didn’t have that nice open crumb. King Arthur bread flour is my go-to brand, but any quality bread flour from your grocery store will do the job. Stock up when it’s on sale.
Salt: Don’t skip the salt. I know it seems like a small thing, but salt does more than just add flavor. It controls the fermentation, strengthens the gluten, and makes the difference between “meh” bread and “wow, where did you buy this?” bread. I use regular kosher salt. Sea salt works great too if that’s what you have on hand. Just measure it properly – too little and your bread tastes bland, too much and it throws off the whole balance.
4) How to Make Sourdough Bread
Step 1. Mix the dough: Grab your biggest mixing bowl and dump in your active starter and water. Use a fork or spoon to swirl them together until they’re combined. Now add your flour and salt. Here’s where it gets messy – mix everything together until you’ve got this shaggy, rough-looking dough. It won’t look pretty at this stage. That’s totally normal. Cover it with a kitchen towel and walk away for 30 minutes. This resting time lets the flour absorb all that water.
Step 2. Stretch and fold: Time to give your dough some attention. Wet your hands first (trust me on this – wet hands prevent sticking way better than floured hands). Reach under one side of the dough, pull it straight up without tearing it, then fold it over the center. Turn the bowl a quarter turn and repeat. Do this for all four sides. You’ll do this whole routine four times over two hours, once every 30 minutes. Each time you do it, the dough gets smoother and stronger. It’s actually pretty satisfying to watch the transformation.
Step 3. Bulk fermentation: Now comes the easiest part. Cover your bowl tightly – I use plastic wrap and then throw a towel over it for good measure. Let it sit at room temperature overnight. We’re talking 8 to 12 hours here. The dough should double in size. Check it in the morning. If it’s more than doubled, no big deal. The bread will still be delicious, just a tiny bit stickier to handle when you shape it.
Step 4. Shape the dough: This is where people get nervous, but don’t be. Scrape your dough out onto a clean, dry countertop. Fold the left side over the middle, then the right side over the middle. Grab the top, fold it down, then roll the whole thing toward you until you reach the bottom. Now use your hands or a bench scraper to push and pull the dough. You’re creating tension on the surface, which helps it hold its shape in the oven. Takes maybe five minutes once you get the hang of it.
Step 5. Proof the dough: Line a bowl or proofing basket with a floured towel. Place your shaped dough in there with the seam side up. Cover it and stick it in the fridge for at least an hour, but ideally 12 to 24 hours. This cold proof is where the flavor really develops. The longer you can let it hang out in the fridge, the better your bread will taste. I usually do mine overnight and bake it the next morning.
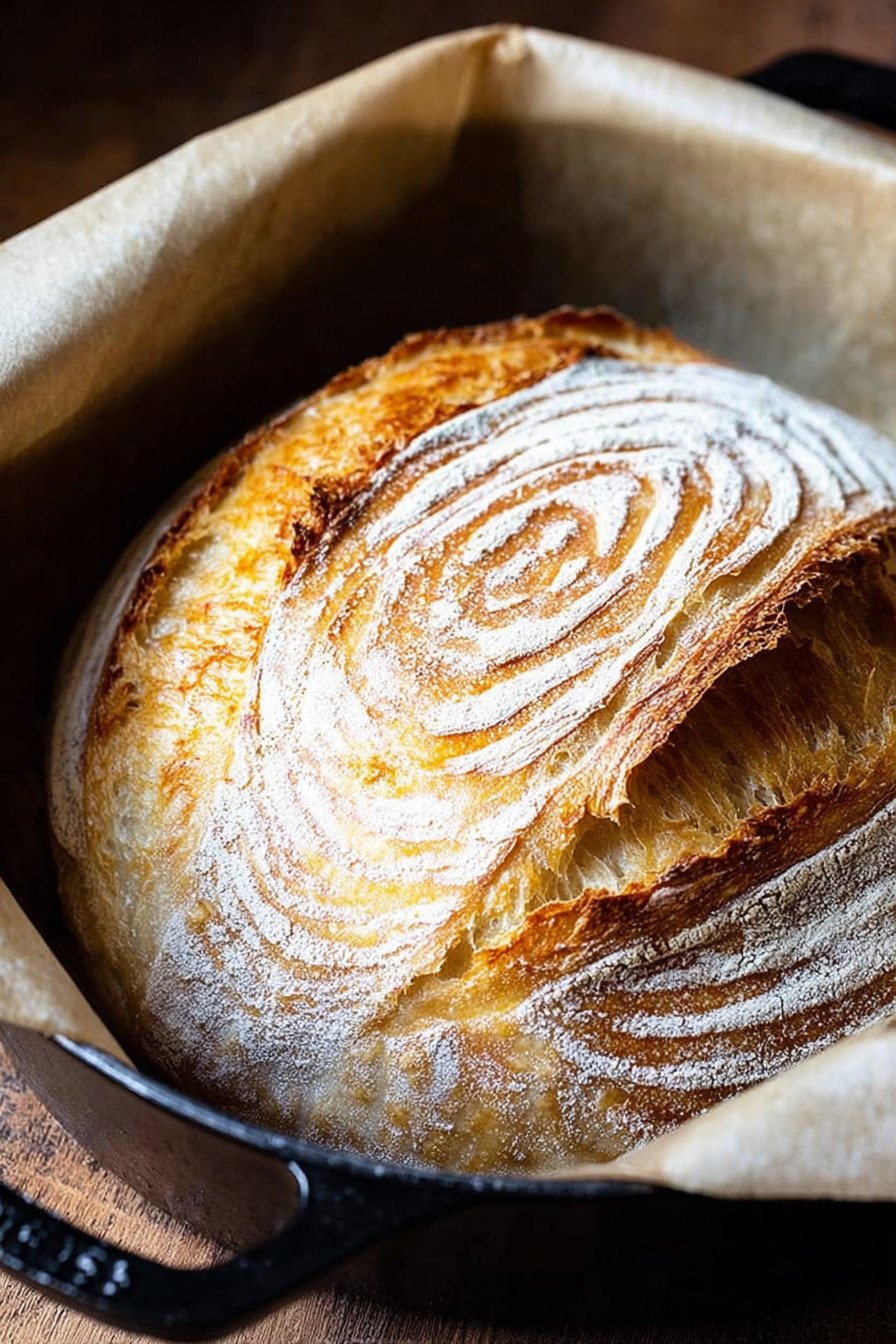
Step 6. Score and bake: Crank your oven to 500 degrees with your Dutch oven inside (lid on). Once it’s hot, flip your dough out onto parchment paper. Use a sharp knife or razor blade to cut a slash across the top. This lets the bread expand properly. Lift the parchment paper with the dough and place it in the hot Dutch oven. Put the lid on, drop the temp to 450, and bake for 30 minutes. Remove the lid and bake another 10 to 15 minutes until it’s deep golden brown.
Step 7. Cool completely: Here’s the hardest part of the whole recipe. You need to wait at least an hour before cutting into your bread. I know it smells incredible and you want to dive in immediately. But if you cut it too soon, the inside will be gummy and dense. Let it cool on a wire rack. The bread is actually still cooking as it cools. Trust the process. Go take a shower, do some laundry, whatever keeps you away from that loaf for an hour.
5) Tips for Making Sourdough Bread
Check your starter before you begin. This is huge. Your starter should double in size within 4 to 6 hours after feeding. If it’s not doing that, feed it again and wait. Using a weak starter is the number one reason sourdough doesn’t rise properly. I learned this the hard way after a couple of disappointing loaves. Now I always do the float test – drop a spoonful of starter into a glass of water. If it floats, you’re good to go. If it sinks, feed it again and wait.
Temperature matters more than you’d think. My kitchen stays pretty cold most of the year, so I use 100 grams of starter for an overnight rise. If your kitchen is warm (above 70 degrees), drop down to 75 grams of starter. Warmer temps speed up fermentation, so less starter gives you more control over timing. I’ve baked this bread in summer and winter, and adjusting the starter amount makes all the difference in keeping the timing consistent.
Invest in a kitchen scale if you haven’t already. Measuring by weight instead of volume makes your bread turn out consistent every time. Flour can pack down in measuring cups, giving you way more flour than you need. A scale eliminates that guesswork. Mine cost like 20 bucks and I’ve used it hundreds of times. Zero out the scale between ingredients – this makes measuring super fast and easy. You can dump everything right into the same bowl without dirtying extra measuring cups.
The Dutch oven is your secret weapon. It traps steam while the bread bakes, which creates that crispy, crackly crust everyone loves. If you don’t have a Dutch oven, put a metal pan on the bottom rack of your oven and pour boiling water into it right before you put the bread in. It’s not quite as good as a Dutch oven, but it helps. I picked up my cast iron Dutch oven at a thrift store for 15 dollars. Best bread investment I ever made.
6) Making Sourdough Bread Ahead of Time
This is hands down the best make-ahead bread recipe I know. The whole method is built around fitting into your life, not the other way around. I usually feed my starter Friday afternoon, mix the dough Friday evening, let it rise overnight, shape it Saturday morning, then let it proof in the fridge all day Saturday. Sunday morning? Fresh bread for breakfast. The long cold proof actually makes the bread taste better – the flavors have more time to develop.
You can hold shaped dough in the fridge for up to 24 hours before baking. Sometimes I push it to 36 hours if I get busy, and it still turns out great. The dough might spread out a bit more, but it bakes up just fine. This flexibility is a lifesaver when you’re juggling work, kids, and everything else. I’ve had dough in my fridge and decided at the last minute to bake it for dinner guests. Preheat the oven, score the dough, and 45 minutes later you look like a baking genius.
Want to prep even further ahead? You can freeze shaped dough. Shape it, put it in your proofing basket, cover it really well with plastic wrap, and freeze it for up to a month. When you’re ready to bake, move it from the freezer to the fridge the night before. Bake it straight from the fridge the next day. I’ve done this for busy weeks when I knew I wouldn’t have time to mix dough. Having frozen dough ready to go is like having a secret stash of homemade bread on demand.
Here’s another trick I love. Mix multiple batches of dough at once. The work is basically the same whether you’re making one loaf or three. Shape them all, proof them in the fridge, then bake them on different days. Or bake them all at once and freeze the extras. Sourdough freezes beautifully. Slice it first, then you can pull out just what you need and pop it in the toaster. Game changer for busy mornings when you want toast but don’t want to commit to a whole loaf.
7) Storing Leftover Sourdough Bread
Room temperature storage is my go-to for the first few days. Once you cut into the loaf, store it cut side down on a cutting board. Sounds weird, but it works. The cut surface stays fresh and the crust stays crispy. If you’re worried about it drying out, put it in a paper bag or bread box. Plastic bags make the crust soft and chewy, which some people like but I’m not a fan. The bread stays good for about five days at room temperature.
After a couple days, I start toasting my slices. Toasted sourdough with butter is breakfast perfection. The bread gets a bit drier as it ages, but toasting brings it right back to life. Sometimes I’ll make croutons with the older slices. Cut them into cubes, toss with olive oil and garlic, bake until crispy. They’re amazing on salads or in soup. Waste not, want not, right? Sourdough is too good to throw away just because it’s a few days old.
Freezing is your best friend for long-term storage. I slice the entire loaf before freezing it. Lay the slices on a baking sheet, freeze them solid, then transfer to a freezer bag. This prevents them from sticking together. When I want toast, I grab a slice or two and pop them right into the toaster from frozen. No thawing needed. The bread tastes just as good as fresh. I’ve kept sourdough in my freezer for three months and it was still delicious.
If you froze a whole loaf and need to thaw it, here’s what works. Take it out of the bag, wrap it in aluminum foil, and put it in a 350-degree oven for about 20 minutes. The crust gets crispy again and the inside warms up perfectly. Let it cool for 10 minutes before slicing. It’s like magic – you’d never know it was frozen. I do this when we have company and I want to serve warm bread without spending all day baking.
8) Try these Bread recipes next!


9) Easy Sourdough Bread

Sourdough Bread Recipe: The Best Easy Method
Ingredients
- 100 grams active sourdough starter (use 75 grams if your kitchen is warm)
- 375 grams water
- 500 grams bread flour
- 12 grams salt
Instructions
Mix the dough
- Grab a large bowl and mix together your starter and water using a spoon or fork. Just swirl it around until it’s combined.
- Toss in the flour and salt, then mix everything until you’ve got this shaggy, messy dough. Don’t worry if it looks rough – that’s exactly what we want.
- Cover the bowl with a towel and let it rest for 30 minutes. This gives the flour time to absorb the water.
Stretch and fold
- Time for the fun part! Wet your hands (trust me, this prevents sticking), then grab one side of the dough from underneath. Pull it straight up without tearing, then fold it over the center.
- Turn your bowl a quarter turn and repeat. Keep going until you’ve done all four sides – think of it like North, South, East, West.
- Cover and let it rest. Repeat this whole stretch and fold thing every 30 minutes for 2 hours (that’s 4 times total). You’ll notice the dough gets tighter and stronger as you go. If you don’t have 2 hours, just do as many as you can manage.
Bulk fermentation (first rise)
- Cover your bowl with an airtight lid or plastic wrap, then throw a towel over it for good measure.
- Let the dough rise at room temperature for 8 to 12 hours until it’s doubled (or almost doubled) in size. If it goes a bit over doubled, don’t panic – the bread will still be delicious, just a little stickier to handle.
Shape
- Scrape the dough out onto a clean, dry surface using your hand.
- Fold the left side over the center, then the right side over the center. Grab the top and fold it down, then roll the dough towards you until you reach the bottom.
- Now comes the magic – use your hands or a bench scraper to push and pull the dough. This creates tension on the surface, which helps it hold its shape while baking.
Proof (second rise)
- Line a bowl or proofing basket with a floured towel (or dust the basket directly with flour).
- Place your dough in there with the seam side facing up and the smooth side down.
- Cover tightly with a towel and pop it in the fridge for 12 to 24 hours. If you’re short on time, even 1 hour helps, but longer is better for flavor and texture.
Preheat the oven
- Put your Dutch oven (with the lid on) into the oven.
- Crank the heat up to 500 degrees and let it preheat completely.
Score
- Take the dough out of the fridge and remove the towel.
- Lay a piece of parchment paper over the basket, then place a plate on top.
- With one hand on the plate and one on the bowl, flip everything over so the dough lands on the parchment-lined plate. Gently remove the bowl.
- Grab a sharp knife, razor blade, or bread lame and score the dough however you like. I usually do one big slash down the side or a simple X across the top.
Bake
- Carefully remove the hot Dutch oven from the oven and take off the lid.
- Grab the edges of the parchment paper and lift the dough into the Dutch oven.
- Put the lid back on and slide it into the oven. Drop the temperature to 450 degrees.
- Bake for 30 minutes with the lid on, then remove the lid and bake another 10 to 15 minutes until the top is deep golden brown.
Cool
- Once it’s done, take the loaf out of the Dutch oven and let it cool on a rack.
- Here’s the hardest part – wait at least 1 hour before cutting into it. I know it smells amazing and you want to dive in right away, but cutting it too soon makes the inside gummy and dense. Trust me on this one!
10) Nutrition
Serving Size: 1 slice (1/10 of loaf), Calories: 190, Sugar: 0.2 g, Sodium: 468 mg, Fat: 0.9 g, Saturated Fat: 0.1 g, Carbohydrates: 38 g, Fiber: 1.3 g, Protein: 6.3 g, Cholesterol: 0 mg


Leave a Comment