
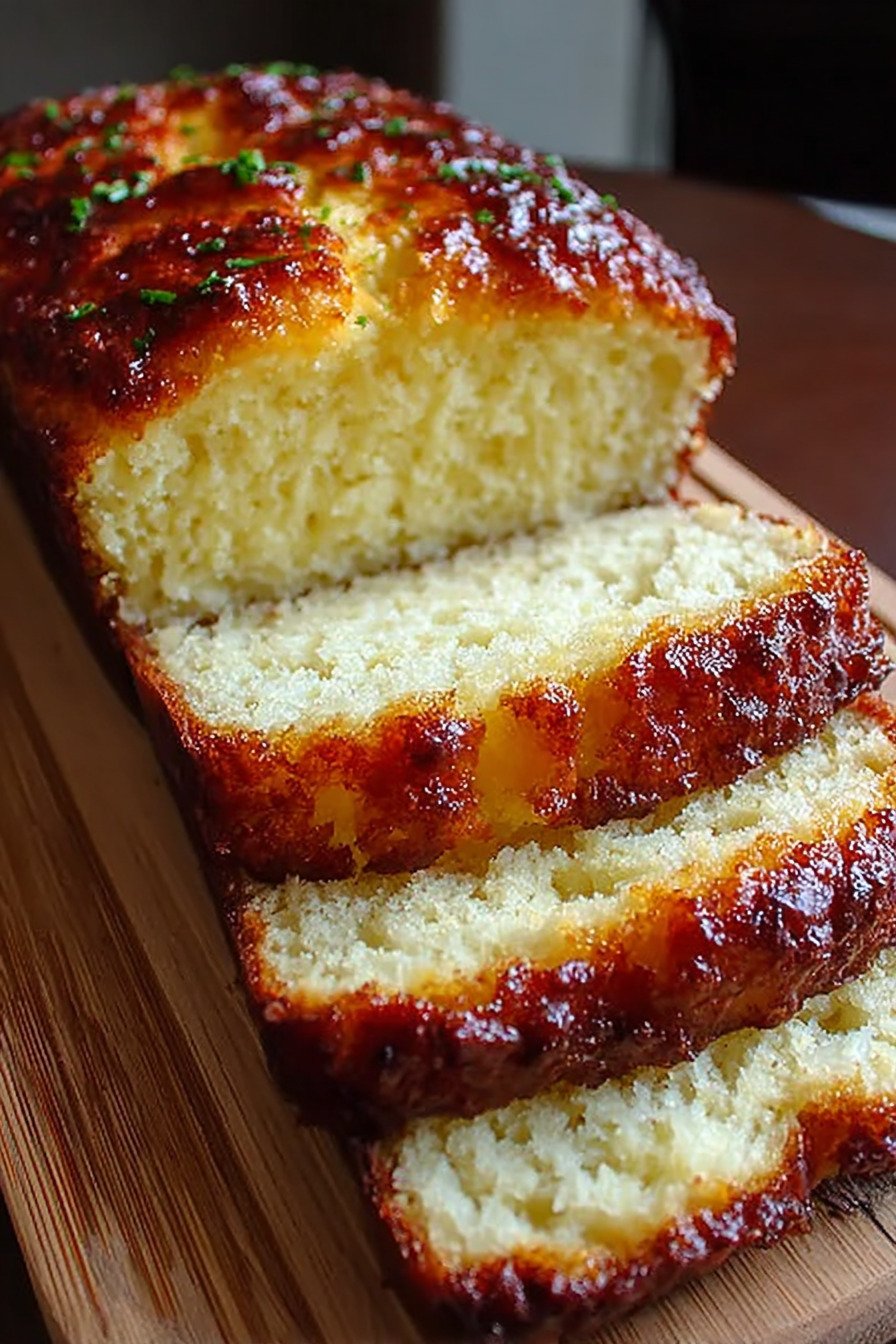
You know what I love about this bread? It smells like home. Every single time I pull it from the oven, I’m transported back to my grandma’s kitchen. She’d be making something warm and wonderful, and we’d all gather around, waiting for that first slice. This Zero Carb Yogurt Bread has become my go-to when I need something quick. I’m talking ten minutes of prep, tops. No fancy equipment. No weird techniques. Just five simple ingredients that probably already live in your pantry. And the best part? It actually tastes like real bread. Not that sad, dense, cardboard stuff some low carb recipes try to pass off as bread. I’ve made this bread at least fifty times now. Sometimes I’ll toast a slice for breakfast with butter. Other times, I’ll use it for sandwiches (yes, real sandwiches!). My kids don’t even know it’s low carb. They just know Mom made bread, and they’re happy about it. That’s the real win right there. The texture is soft and just a little bit fluffy. The yogurt keeps everything moist without making it gummy. And that almond flour? It gives this gorgeous, slightly nutty flavor that makes you want another slice. Then maybe one more. Okay, fine, just one more after that.

Table of Contents
- 1) Key Takeaways
- 2) Easy Zero Carb Yogurt Bread Recipe
- 3) Ingredients for Zero Carb Yogurt Bread
- 4) How to Make Zero Carb Yogurt Bread
- 5) Tips for Making Zero Carb Yogurt Bread
- 6) Making Zero Carb Yogurt Bread Ahead of Time
- 7) Storing Leftover Zero Carb Yogurt Bread
- 8) Try these Bread next!
- 9) Zero Carb Yogurt Bread
- 10) Nutrition
1) Key Takeaways
- What makes this yogurt bread zero carb?
- Can I use regular yogurt instead of Greek yogurt?
- How do I know when the bread is fully baked?
- What can I substitute for almond flour?
- How long does zero carb yogurt bread stay fresh?
2) Easy Zero Carb Yogurt Bread Recipe
I’ve been making Keto Recipes for about three years now, and this Zero Carb Yogurt Bread has become one of my absolute favorites. When I first started with Keto Recipes, I thought I’d never eat bread again. Boy, was I wrong! This recipe changed everything for me.
Quick and simple. That’s what I love most about this bread. We’re talking about ten minutes of actual work. No kneading. No waiting for dough to rise for hours. Just mix, pour, and bake. My mornings used to be chaos when I’d try making complicated low carb bread recipes. Now? I can have fresh bread ready before my coffee finishes brewing.
The texture surprises everyone who tries it. My neighbor Karen swore she’d never like any kind of diet bread. I gave her a slice warm from the oven with butter melting into it. She came back the next day asking for the recipe. That’s happened at least a dozen times now. People just don’t expect bread this good when they hear “zero carb.”
Five ingredients. That’s all you need. Greek yogurt, eggs, almond flour, baking powder, and salt. I bet you have most of these sitting in your kitchen right now. No need to hunt down weird specialty ingredients at expensive health food stores. Just regular pantry staples that work together like magic.
Versatile? Oh yes. Toast it for breakfast. Make sandwiches for lunch. Serve it alongside soup for dinner. I’ve even used it to make French toast on lazy Sunday mornings. My kids eat it without complaint, which tells you everything you need to know. Kids are brutally honest about food they don’t like.
The smell fills your whole house. You know that warm, comforting bread smell that makes you feel like you’re home? This delivers that same feeling. My husband can tell from upstairs when I’m baking this bread. He’ll come down with this hopeful look on his face, already reaching for the butter.
Perfect for people watching their carbs. But here’s the secret. You don’t have to be on any special diet to enjoy this bread. It’s just genuinely delicious bread that happens to be low in carbs. I serve it to everyone, and nobody complains. They just ask for more.

3) Ingredients for Zero Carb Yogurt Bread
Greek Yogurt
Get the full fat kind if you can. None of that fat free stuff. We want richness here. The yogurt does something magical to this bread. It keeps everything moist without making it dense or gummy. I’ve tried this with regular yogurt before, and it just doesn’t work the same way. Greek yogurt is thicker, and that thickness matters. Make sure it’s plain and unsweetened. Vanilla yogurt will make your bread taste weird, trust me on that one. I learned that lesson the hard way when I grabbed the wrong container from the fridge one rushed morning.
Large Eggs
Two eggs bind everything together. They give the bread structure and a little lift. Room temperature eggs work better, but I’ll be honest with you. I almost never remember to take them out ahead of time. I just use them straight from the fridge and everything turns out fine. If you want to be fancy about it, put them in a bowl of warm water for five minutes before cracking them. That’ll bring them to room temperature quick.
Almond Flour
This is your flour substitute, and it’s the star of the show. Almond flour gives you that slightly nutty, rich flavor that makes this bread special. Don’t try using almond meal instead. Almond meal is coarser and grittier. You want the fine, powdery almond flour. I buy mine in bulk from Costco now since I use so much of it. Way cheaper that way. Store it in the freezer to keep it fresh. Almond flour can go rancid if you leave it sitting in your pantry for months. Similar to how Almond Flour Desserts and Almond Flour Bagels rely on quality flour, so does this bread.
Baking Powder
Just one teaspoon. That’s all you need for lift. Baking powder is what makes this bread rise instead of turning into a flat, sad pancake. Make sure your baking powder isn’t old. I keep mine in a sealed container with a little note on top telling me when I opened it. Old baking powder loses its power, and your bread won’t rise properly. Test it by dropping a spoonful into hot water. If it bubbles like crazy, you’re good to go.
Salt
Half a teaspoon. Don’t skip the salt. I know it seems like such a small amount, but salt brings out all the other flavors. Without it, your bread will taste flat and boring. I use regular table salt, but sea salt or kosher salt work fine too. Just remember that kosher salt is coarser, so you might need a bit more if that’s what you’re using. Salt is that secret ingredient that makes everything taste more like itself.

4) How to Make Zero Carb Yogurt Bread
Step 1
Turn your oven to 350°F. Don’t stick your bread in a cold oven and hope for the best. I tried that once when I was impatient. The bread turned out weird and dense. Just wait for the oven to preheat. It takes about ten minutes. Use that time to get your ingredients ready. Line your loaf pan with parchment paper while you wait. I cut two long strips that cross each other in the pan with the ends hanging over the sides. Makes it super easy to lift the whole loaf out later.
Step 2
Crack your eggs into a medium bowl. Add the Greek yogurt. Grab a whisk and mix them together until smooth. You don’t need any fancy electric mixer for this. Just good old elbow grease. It takes maybe thirty seconds of whisking. You want everything combined so you can’t see any streaks of egg white. The mixture should look creamy and uniform. This wet mixture is the base of your bread, so make sure it’s nice and smooth.
Step 3
Get another bowl. I know, more dishes to wash. But this step matters. Put your almond flour, baking powder, and salt in there. Whisk them together. This distributes the baking powder evenly through the flour. If you skip this step, you might get pockets of baking powder that taste bitter. Nobody wants that. Whisk for about ten seconds. Just until everything looks uniform.
Step 4
Pour the dry ingredients into the wet ingredients. Here’s where people mess up. They get excited and stir like crazy. Don’t do that. Stir gently. Fold the mixture together with a spatula. Stop as soon as you can’t see any dry streaks of flour. Overmixing makes the bread tough and dense. We want tender, fluffy bread. So be gentle. Pretend you’re folding delicate flower petals instead of mixing bread batter.
Step 5
Scrape all that batter into your prepared loaf pan. Use your spatula to smooth the top. It doesn’t need to be perfect. Just reasonably level. The batter is thick, almost like frosting. That’s exactly how it should look. If your batter seems runny, something went wrong. Check that you measured everything correctly.
Step 6
Slide the pan into your preheated oven. Set a timer for 25 minutes. When the timer goes off, check your bread. Stick a toothpick right into the center. If it comes out clean, you’re done. If there’s wet batter on it, give the bread another five minutes and check again. Every oven is different. Mine always takes exactly 28 minutes. Yours might be faster or slower.
Step 7
Take the pan out of the oven. Let the bread sit in the pan for ten minutes. I know you want to cut into it right away. The smell is driving you crazy. But wait. If you try to remove it too soon, it’ll fall apart. Those ten minutes let the bread firm up. After ten minutes, use those parchment paper tails to lift the whole loaf out. Move it to a cooling rack. Let it cool completely before slicing. A hot loaf will crumble into a mess when you try to cut it.
5) Tips for Making Zero Carb Yogurt Bread
Measure your almond flour correctly. This matters more than you’d think. Almond flour is tricky to measure. It clumps together. Fluff it up with a fork before measuring. Then spoon it into your measuring cup. Level it off with a knife. Don’t pack it down. Packed almond flour gives you way too much, and your bread will be dense and dry. I keep my almond flour in a container with a fork right in it. Reminds me to fluff before measuring.
Use full fat Greek yogurt. Low fat or fat free yogurt has different moisture content. Your bread needs that fat for richness and texture. I’ve tried making this with low fat yogurt when that’s all I had. The bread turned out okay, but not great. It was drier and less flavorful. Save yourself the disappointment and use full fat. Your bread will thank you. Plus, those healthy fats are good for you when you’re doing Carb Free Recipes.
Don’t open the oven door. I know you want to peek. Resist the urge. Opening the oven door drops the temperature fast. Your bread needs consistent heat to rise properly. Wait until your timer goes off before checking. Then be quick about it. Stick your toothpick in, check it, and close that door if it needs more time. Think of your oven like a moody teenager. It doesn’t like being disturbed.
Line your pan with parchment paper. You can grease and flour your pan instead. But parchment makes life so much easier. The bread lifts right out without any struggle. No stuck corners. No torn edges. No scraping with a knife trying to get it loose. I buy pre cut parchment sheets that fit my loaf pan perfectly. Worth every penny for the convenience.
Let it cool completely. This is the hardest tip to follow. I get it. That bread smells amazing. You want to eat it right now. But warm bread is crumbly bread. It needs time to set up. If you cut it while it’s hot, you’ll get a ragged mess instead of nice, clean slices. Cool it on a wire rack for at least 30 minutes. An hour is better. Then you can slice it beautifully and it’ll hold together perfectly when you spread butter on it.
Check your baking powder. Old baking powder won’t work. It loses its leavening power over time. If your bread comes out flat and dense, old baking powder is probably the culprit. Test it before using. Drop a bit into hot water. It should bubble vigorously. No bubbles? Toss it and buy fresh. Write the date on the container when you open it. Replace it every six months or so.
Adjust for your oven. All ovens are liars. They tell you they’re at 350°F, but they might actually be at 335°F or 365°F. Get an oven thermometer. They’re cheap. Hang it on your oven rack and check the real temperature. If your oven runs hot, your bread might be done in 23 minutes. If it runs cool, you might need 32 minutes. Get to know your oven’s personality. Take notes if you need to.
6) Making Zero Carb Yogurt Bread Ahead of Time
This bread is perfect for meal prep. I make two loaves every Sunday. Slice one for the week ahead. Freeze the other for later. Having fresh bread ready to go makes busy mornings so much easier. No excuses for skipping breakfast when you’ve got bread ready in the fridge. Just toast a slice, add some butter or cream cheese, and you’re set.
You can mix the dry ingredients ahead of time. Measure your almond flour, baking powder, and salt into a container. Label it. Store it in your pantry. When you’re ready to bake, just add the wet ingredients and go. This cuts your active prep time down to about five minutes. I keep several of these pre measured containers ready to go. Makes baking on a whim super easy.
The batter doesn’t keep well. Don’t mix everything together and then stick it in the fridge hoping to bake it later. It won’t work. The baking powder starts reacting as soon as it touches the wet ingredients. If you wait too long, you’ll lose all your rise. Mix and bake right away. No delays. This isn’t the kind of recipe where you can prepare the batter the night before.
Bake and freeze works great. Make your bread. Let it cool completely. Slice it. Wrap individual slices in plastic wrap. Stack them in a freezer bag. Label it with the date. Pull out slices as you need them. They thaw in minutes on the counter. Or pop them straight into the toaster from frozen. Perfect for those mornings when you’re running late and need something quick. This works great with other Keto Snacks too.
The bread stays fresh for about five days in the fridge. Wrap it well in plastic wrap or store it in an airtight container. It’ll dry out if you leave it uncovered. The moisture from the yogurt keeps it tender for several days. By day six or seven, it starts getting a bit dry. Still edible, but not quite as nice as fresh. If you’re not going to eat it within a week, freeze it.
You can reheat slices in the microwave. Just ten seconds makes a slice taste fresh baked again. Don’t overdo it, or you’ll make it rubbery. Quick zap, that’s all it needs. Or use your toaster. Toasted slices are honestly better than fresh in my opinion. The edges get crispy and golden. The inside stays soft. Spread butter on it while it’s hot and watch it melt into all those little air pockets.
7) Storing Leftover Zero Carb Yogurt Bread
Room temperature storage works for a day or two. Wrap the cooled loaf tightly in plastic wrap. Keep it on your counter away from direct sunlight. Don’t put it in a bread box. Those trap moisture and can make the bread go moldy faster. Just wrapped on the counter is fine for short term storage. Perfect if you know you’ll eat the whole loaf within 48 hours.
The fridge is better for longer storage. Once you slice your bread, store those slices in an airtight container. Stack them with small pieces of parchment paper between slices if you want to be fancy. This keeps them from sticking together. The cold air in your fridge keeps everything fresh for up to five days. Maybe even six if you’re lucky. Just remember to let slices come to room temperature before eating, or toast them. Cold bread isn’t nearly as good as room temperature bread.
Freezing is your best friend. This bread freezes beautifully. Wrap individual slices in plastic wrap. Then put all the wrapped slices in a freezer bag. Squeeze out as much air as you can. Write the date on the bag. Frozen bread stays good for three months. Maybe longer, but I’ve never had any last that long. We always eat it too fast. Pull out slices as needed. They thaw fast.
Thaw frozen slices on the counter. Takes about 15 minutes at room temperature. Or stick them in the toaster straight from frozen. The toaster works perfectly. You can’t even tell it was frozen. The texture stays exactly the same. None of that soggy, weird texture you sometimes get with frozen bread. The almond flour and yogurt combo holds up really well to freezing and thawing.
Don’t refreeze thawed bread. Once you thaw it, eat it. Refreezing makes the texture weird. The moisture does strange things when you freeze it twice. I learned this the hard way when I thawed out too many slices one morning. They went rubbery and tough after I tried to freeze them again. Just thaw what you’ll actually eat. Better to make another trip to the freezer than to waste bread.
Watch for mold. Check your stored bread every day or two. Almond flour products can mold faster than regular bread. If you see any fuzzy spots, toss the whole thing. Don’t try to cut around the mold. The spores spread through the bread even if you can’t see them. Better safe than sorry. This is rare if you store it properly, but it can happen. Just keep an eye on it, especially if your kitchen is warm and humid.
Revive dry bread. If your bread gets a bit dry after a few days, don’t throw it away. Sprinkle the slices lightly with water. Pop them in a 300°F oven for about five minutes. The steam from the water refreshes the bread and makes it soft again. Works like magic. I do this all the time when I forget to wrap the bread properly and it dries out overnight.
8) Try these Bread next!


9) Zero Carb Yogurt Bread

Zero Carb Yogurt Bread – Easy Keto Recipes
Ingredients
- 1 cup unsweetened Greek yogurt (plain, full fat works best)
- 2 large eggs
- 1 cup almond flour
- 1 teaspoon baking powder
- ½ teaspoon salt
Instructions
- Get your oven going at 350°F (175°C). Don’t skip the preheating. I learned that one the hard way.
- Grab a small loaf pan and line it with parchment paper. You can grease it instead, but trust me, parchment makes life way easier when you’re trying to get the bread out later.
- Crack those eggs into a medium bowl. Add the Greek yogurt. Whisk them together until they’re smooth and happy looking.
- Take another bowl (I know, more dishes, but it’s worth it) and whisk together your almond flour, baking powder, and salt.
- Pour the dry stuff into the wet stuff. Stir gently. And I mean gently! Just until you can’t see any dry streaks anymore. Overmixing makes the bread tough, and nobody wants tough bread.
- Scrape that batter into your prepared pan. Smooth the top with a spatula.
- Slide it into the oven. Set a timer for 25 minutes, then check it. Poke a toothpick right in the center. If it comes out clean, you’re done. If it’s still wet, give it another 5 minutes.
- Let the bread hang out in the pan for 10 minutes after baking. Then move it to a cooling rack. I know waiting is torture, but cutting it too soon means crumbly, falling apart bread.
10) Nutrition
Serving Size: 1 slice (1/8 of loaf), Calories: 98, Sugar: 1.2 g, Sodium: 183 mg, Fat: 7.1 g, Saturated Fat: 1.3 g, Carbohydrates: 3.8 g, Fiber: 1.4 g, Protein: 6.2 g, Cholesterol: 47 mg


Leave a Comment